CBusiness Investment Pro WordPress Theme Documentation
Welcome to CBusiness Investment Pro WordPress Theme. This documentation will guide you. If you need any help, please see the Support section.
1. Theme Installation
a. Through WordPress Dashboard
- Go to the menu Appearance » Themes and click on the Add New button.
- Click on the Upload Theme button.
- Click the Browse button and navigate to the unzipped theme package on your computer.
- Look for a file called cbusiness-investment-pro.zip, select it, then click OK.
- Click the Install Now button and wait until the installation is complete.
- Click the Activate link to activate the theme on your WordPress site.
b. Manual Installation using FTP client
If you know the FTP login details of the server where your site is hosted and you have a FTP client installed (such as FileZilla), you might consider using this way of uploading your theme.
- Unzip the cbusiness-investment-pro.zip file.
- Using an FTP client, access your host web server and go to /wp-content/themes.
- Upload the theme folder to /wp-content/themes/.
- Go to Appearance » Themes and activate the theme from the Dashboard.
You can activate the theme after it is uploaded on the server. In order to activate this theme you have to go to the admin panel » Appearance » Themes . In this section you should see the theme with a title CBusiness Investment Pro . Just click on the Activate button and your theme should get activated.
c. Plugin Installation
Please download the customizer-export-import.zip plugin and upload it from the Plugins section.
- To upload the plugin, see: https://wordpress.org/plugins/customizer-export-import/ — it includes installation instructions.
- After installing the plugin, activate it and go to Appearance » Customize » Import/Export.
- Download the exported settings file (local version) from the documentation folder: cbusiness-investment-pro-export.dat. If the file is not saved automatically, save it as cbusiness-investment-pro-import.dat.
- Upload cbusiness-investment-pro-import.dat in the Import section of the Customizer.
- If you need to import demo content, download the demo XML file below and import it via Tools » Import » WordPress.
- After completing the steps above your theme will be configured with the provided settings.
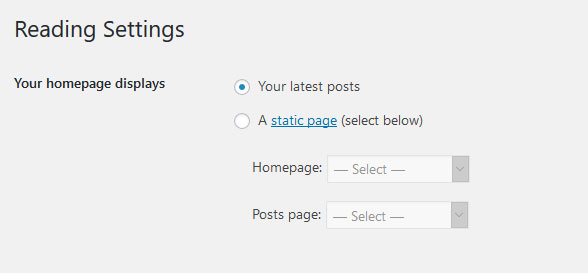
2. Homepage Setup
After activating the CBusiness Investment Pro theme, please set up the homepage using the following steps:
- Go to Settings » Reading » Your homepage displays
- Select the radio button for Your latest posts
- Go to Appearance » Theme Options and click Restore Defaults at the bottom
3. The header
The header consists of three main elements:
- Contact info & social media
- Site Name / Logo
- Menu

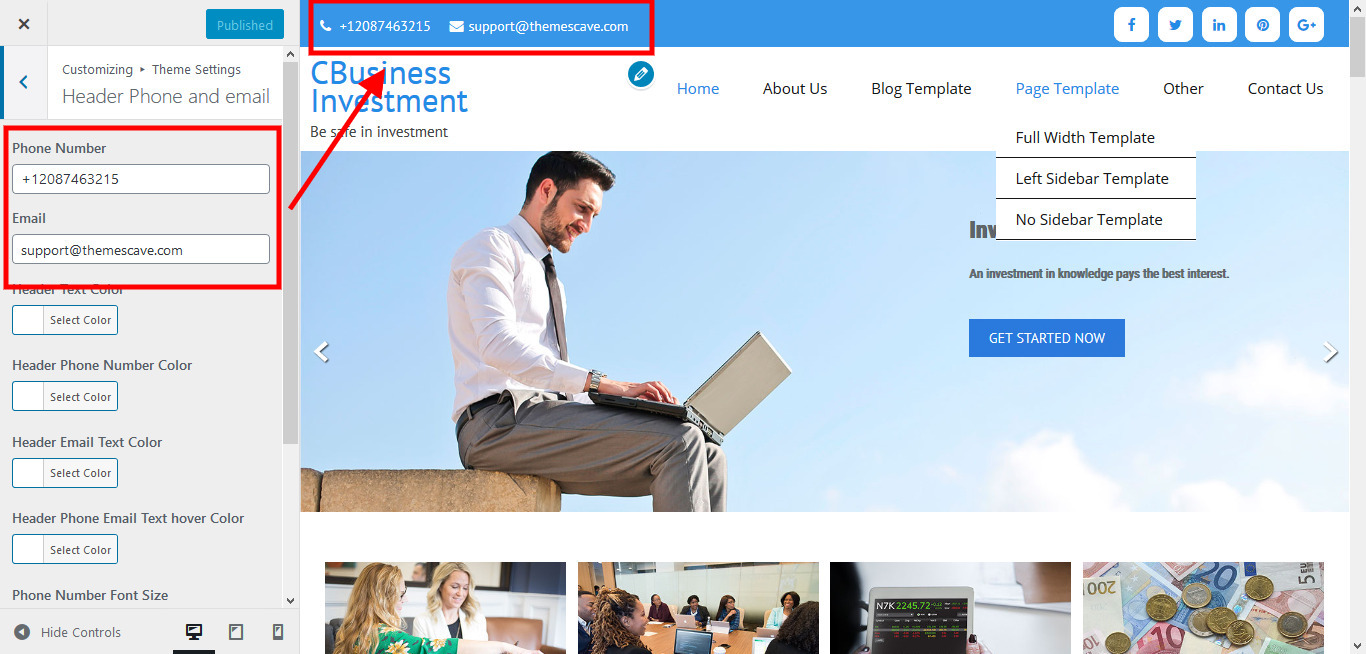
a. Contact info & social media
To customize the top header bar of contact information social media links
Go to Appearance » Customizer » Theme Settings » Header Phone and email
b. Changing the site name / logo
If you don't have your logo image then you can use site name and tagline. To change site name and tagline
Go to Appearance » Customizer » Site identity
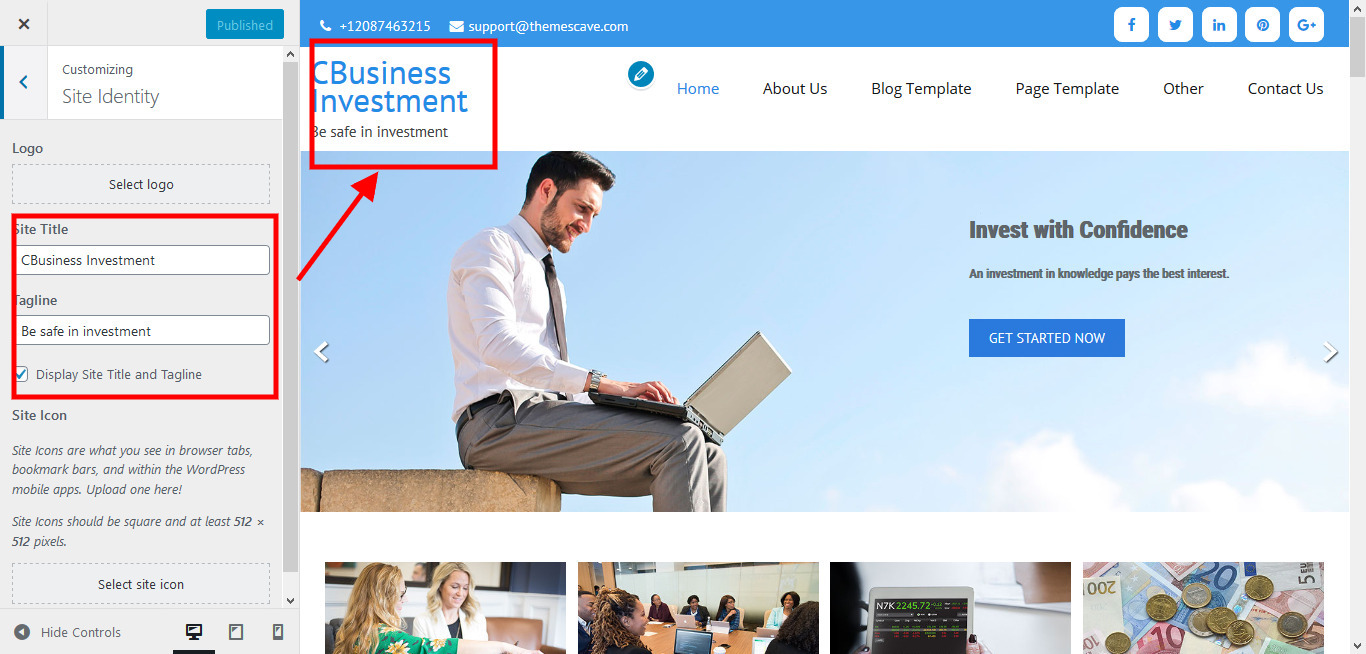
Or, if you want to upload a logo for your website go to
Appearance » Customizer » Basic Settings » Site identity » Logo
You can also increase the logo image height as needed from Appearance » Customizer » Theme Settings » General settings » Add logo height size.
c. Setting the menu
- First, create pages from Pages » Add new page
- Go to Appearance » Menu
- Click on the Create a new menu link
- Give a name to your menu in the Menu name field and click the Save Menu button
- After creating the menu, add pages by selecting the checkboxes and arrange items by drag and drop.
- Select the menu theme location Primary Menu from Menu Settings
- Click Save Menu after adding required pages and categories

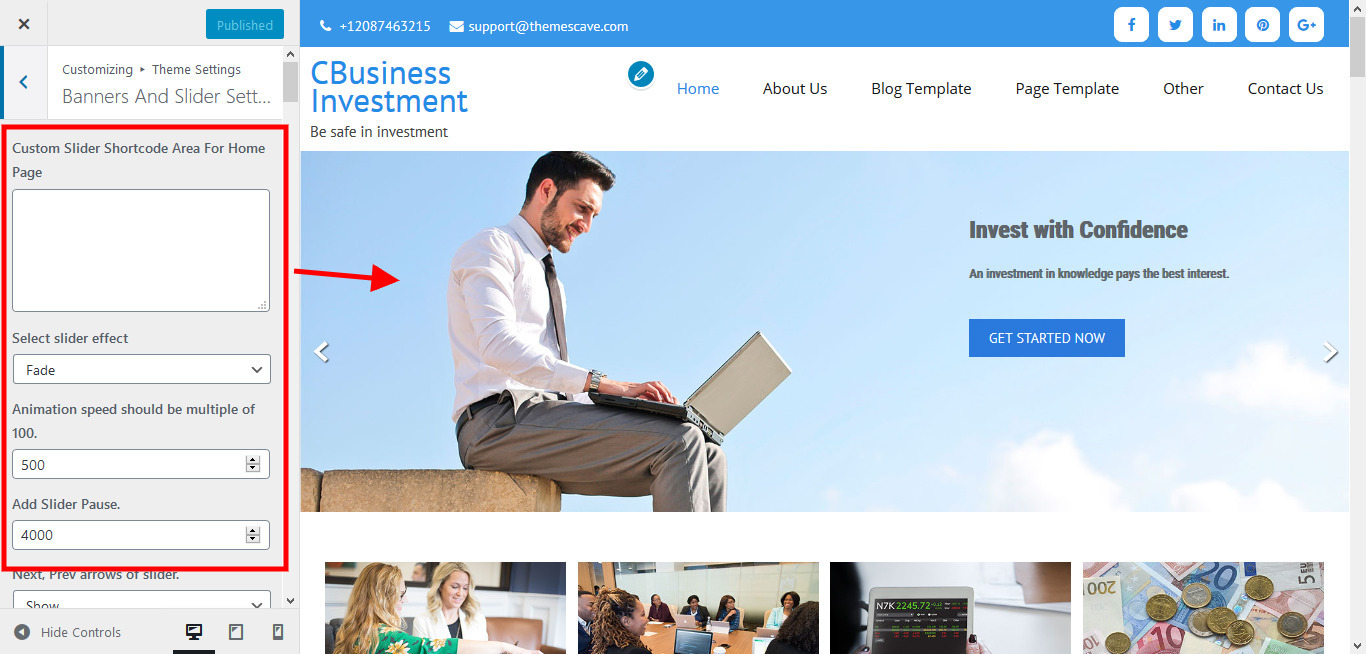
4. Homepage Slider

In order to add slides to homepage slider: Go to Appearance » Customize » Theme Settings » Banners And Slider Setting
For each slide there are different options that you can apply.
- You can change Slider Effects and Timing.
- You can change Slider Animation speed, pause time
- You can change Slider Hide/Show Direction Navigation of the slider.
- You can change Slider Hide/Show pager of slider.
- You can change Slider Pause Slide on Hover.
- Default image for slider is 1600 × 550 pixels
If you don't want to use this default image slider, you can use any image slider WordPress plugin
- Go to Appearance » customize » Theme Settings » Banners And Slider Setting » Custom Slider Shortcode Area For Home Page
- Enter your slider shortcode which is provided by plugin without php tag

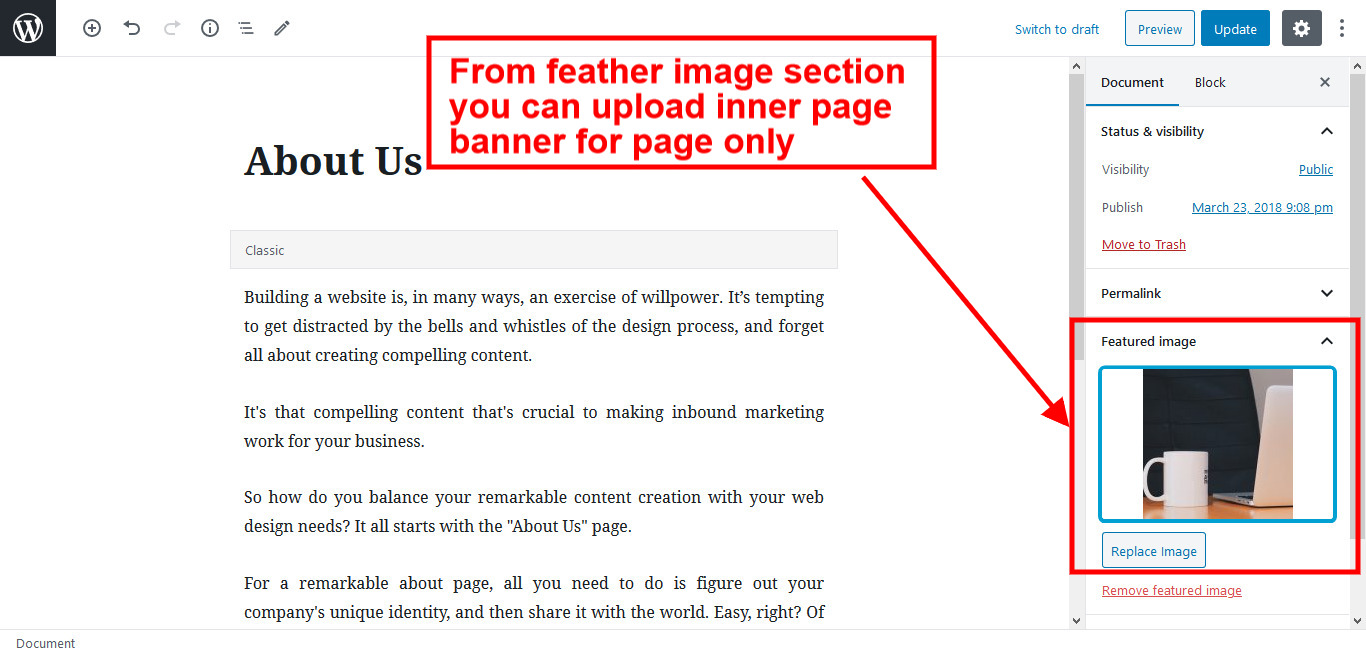
5. Inner Page Banner

To change inner page banner image: Go to Appearance » customize » Theme Settings » InnerPage Header Banne
To set different banner image for each individual page
- Edit that page and set Featured Image
- Default image size for inner page banner image is 1600 x 400 pixels

6. Homepage Section
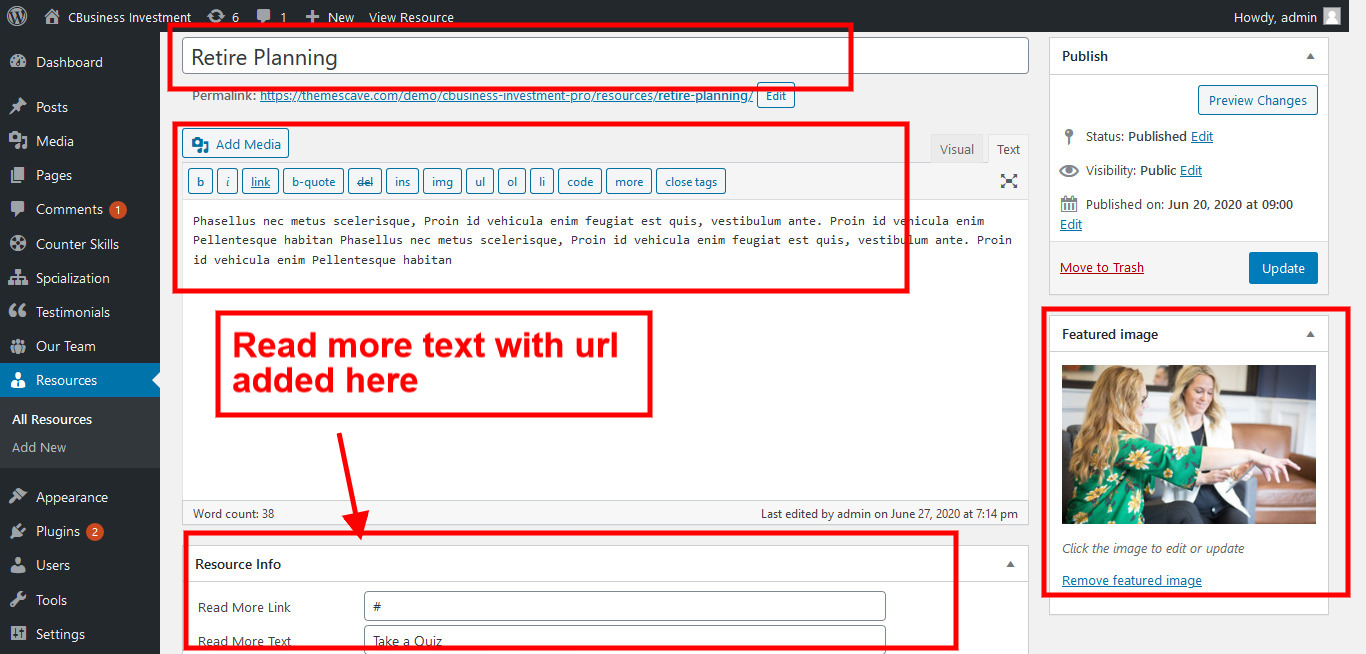
1. Resources!
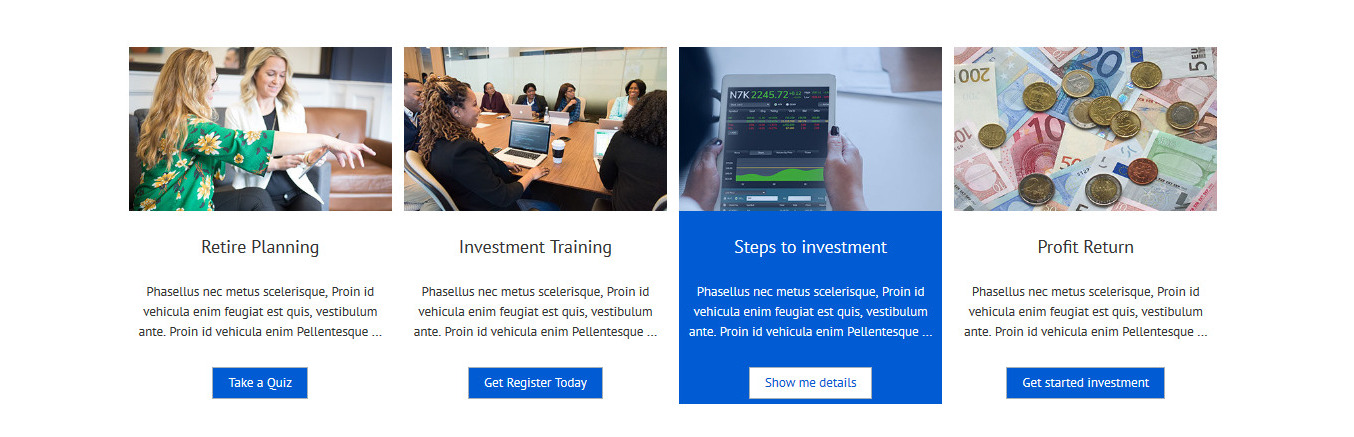
To manage this section
- Click on Resources » Add New
- Then fill all fields with the top icon
- To show the section on the home page follow these steps
- Go to Appearance » Customize » Home Sections Settings » Resource Section and add the shortcode below in Section 1
[column_content][resources button_text="Read More"][/column_content]

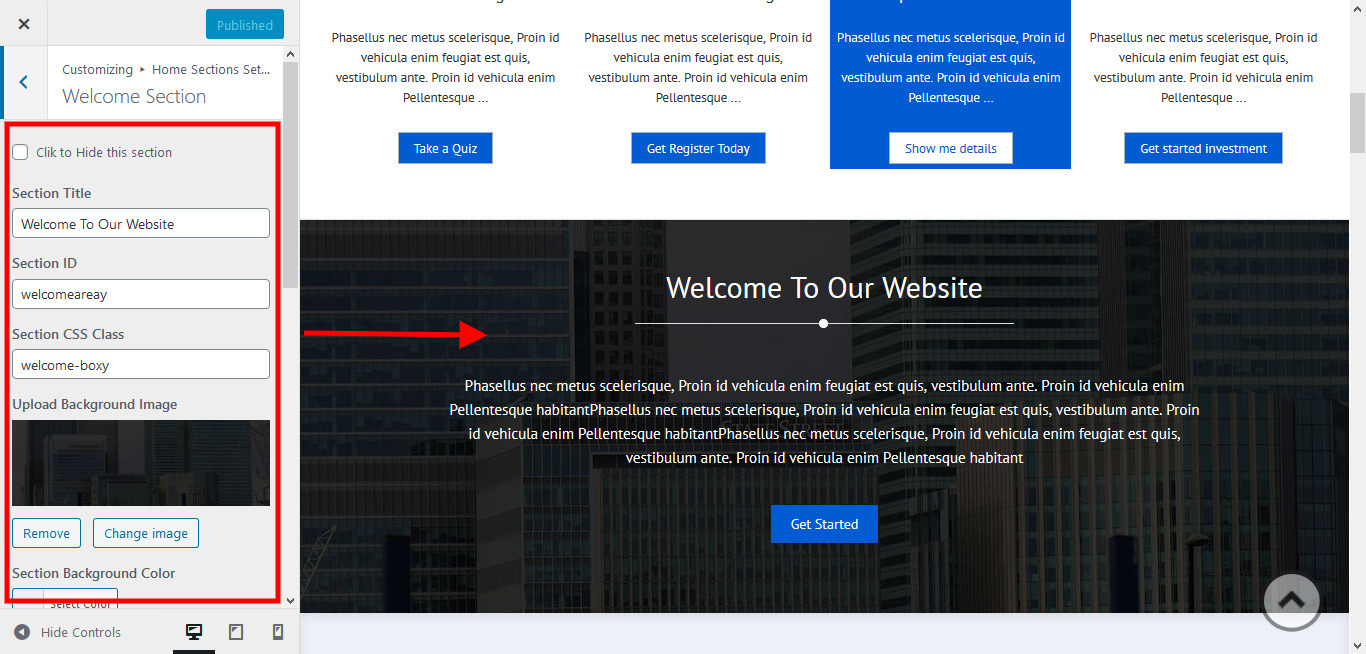
2. Welcome Sections

To manage this section
- Go to Appearance » Customize » Home Sections Settings » Welcome Section
- Add the shortcode below to the content section:
[column_content][underline marginbottom="50"][/column_content][welcome_website content="Phasellus nec metus scelerisque, Proin id vehicula enim feugiat est quis, vestibulum ante. Proin id vehicula enim Pellentesque habitant..." text="Get Started" url="#"]
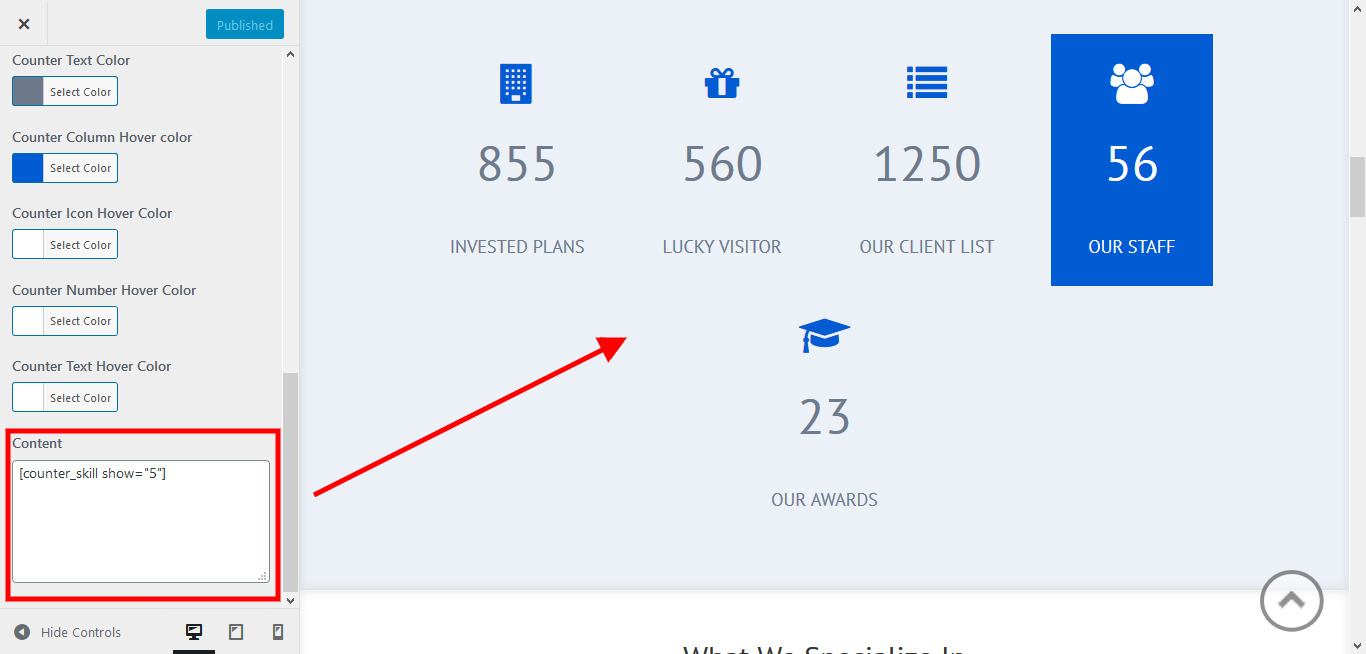
3. Skill Counter Sections

To manage this section
- Click on Counter Skill » Add Counter Skill
- Then fill all fields and choose an icon
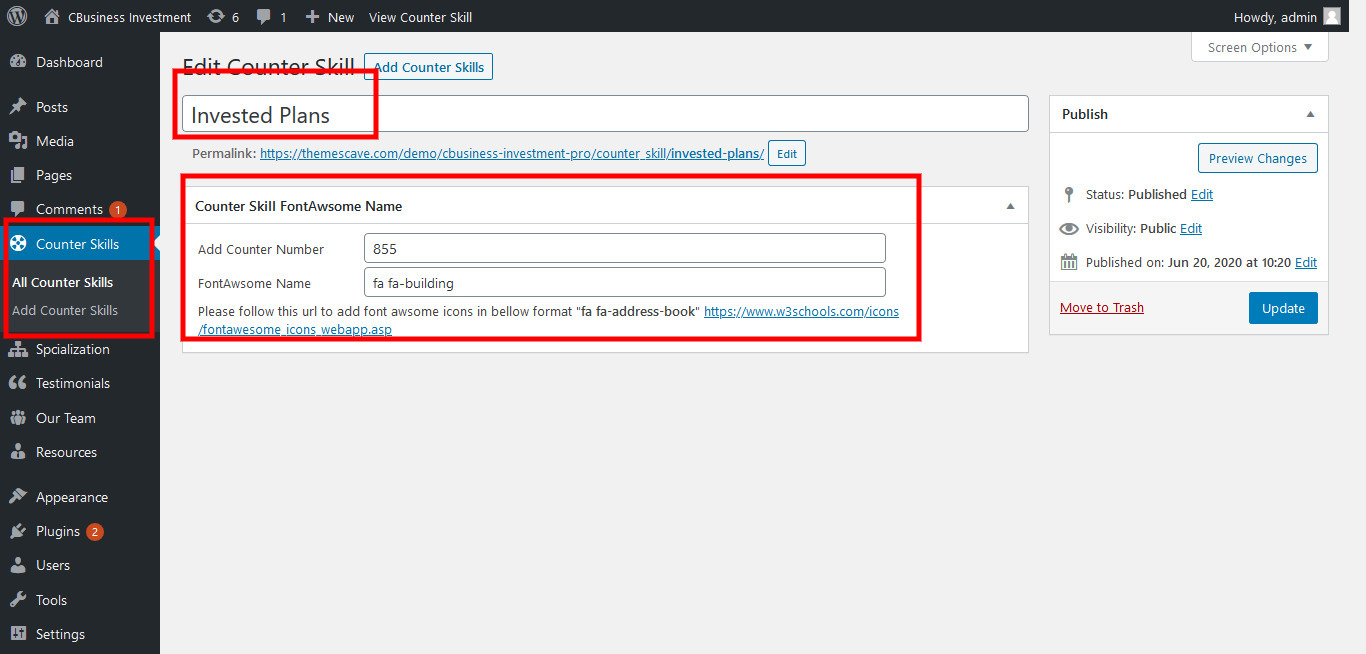
- Go to Appearance » Customize » Home Sections Settings » Counter Skill Section
- Add the shortcode below to the content section:
[counter_skill show="5"]
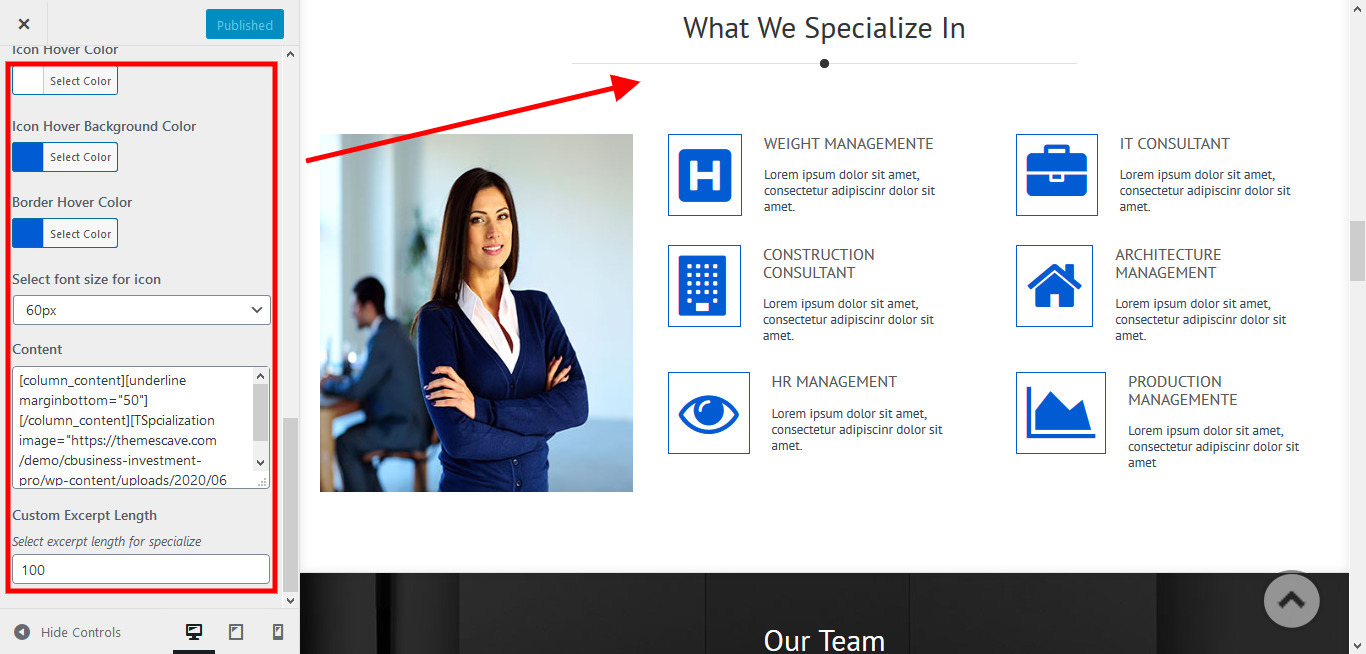
5. Specialize Sections
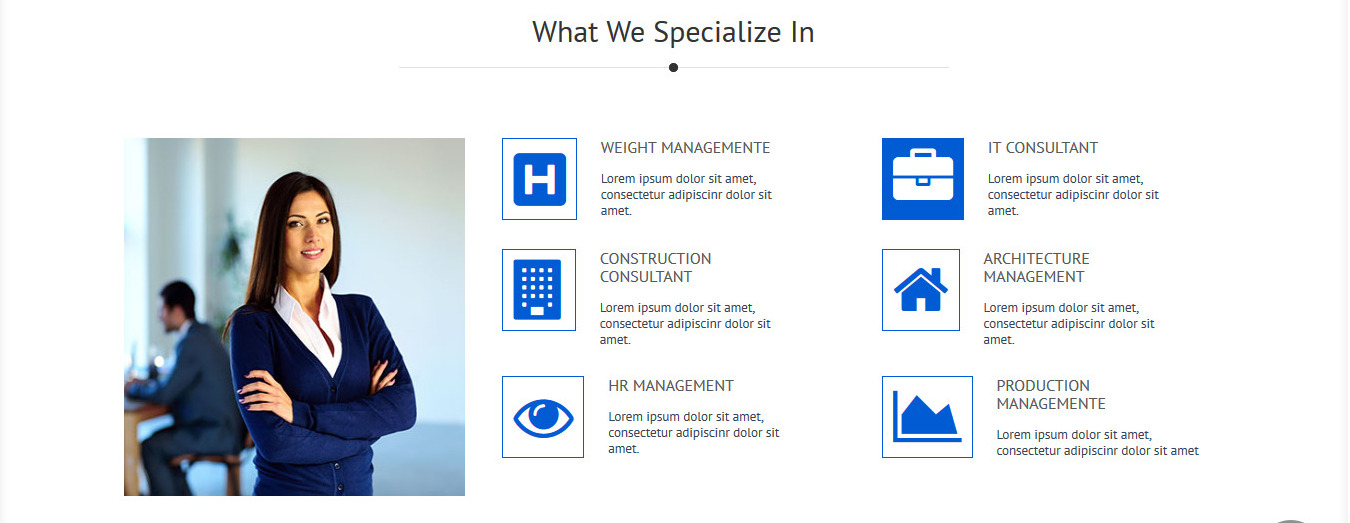
To manage this section
- Go to Appearance » Customize » Home Sections Settings » Specialize Section
- Add the shortcode below to the content section:
[column_content][underline marginbottom="50"][/column_content][TSpcialization image="https://themescave.com/demo/cbusiness-investment-pro/wp-content/uploads/2020/06/offerthumb.jpg" show="6"]
- To work on Specialization go to Specialization » Add Specialization, add details and click Publish.

5. Our team content Sections
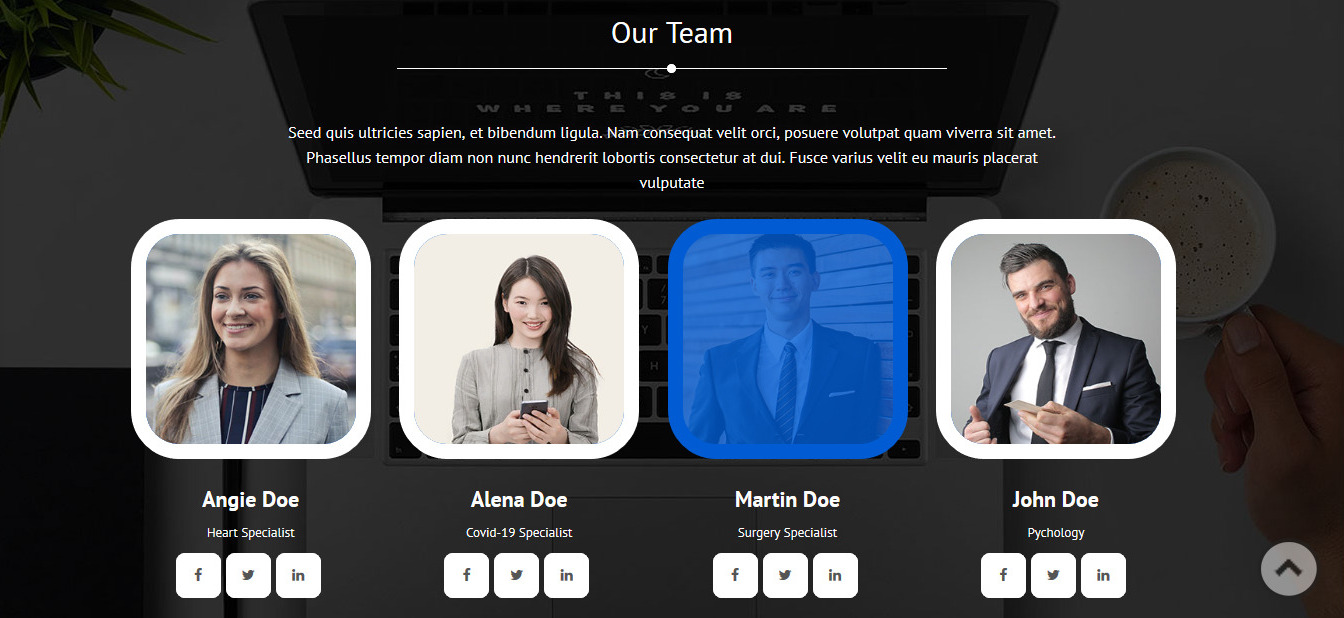
To manage this section
- Go to Appearance » Customize » Home Sections Settings » Team Section
- Add the shortcode below to the content section:
[column_content][underline marginbottom="50"][/column_content][caveteam show="4" teamcontent="Seed quis ultricies sapien, et bibendum ligula. Nam consequat velit orci, posuere volutpat quam viverra sit amet. Phasellus tempor diam non nunc hendrerit lobortis consectetur at dui. Fusce varius velit eu mauris placerat vulputate"]

- To manage the team, go to Our Team » Add New, add details and click Publish.

7. Latest News
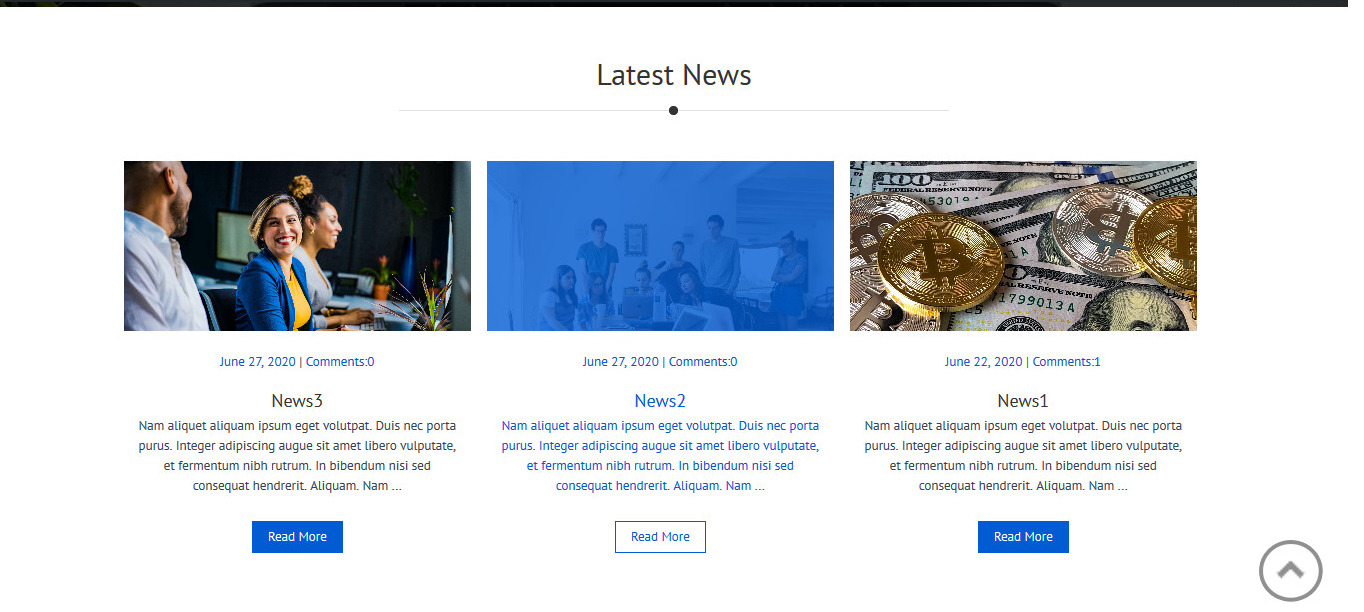
To manage this section go to Appearance » customize » Home Sections Settings » News Section
Add the shortcode below to the content section :[column_content][underline marginbottom="50"][/column_content][fthernews show="3"]
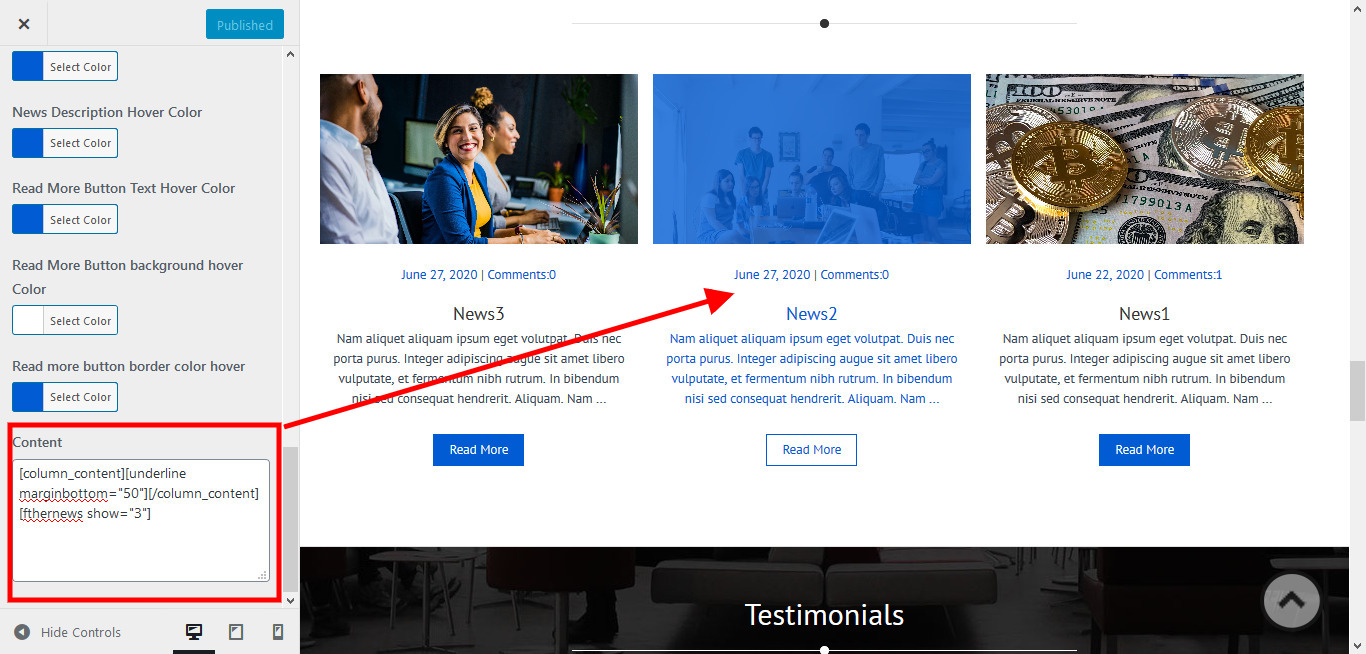
To work on News, go to Posts » Add New, add details and click Publish.

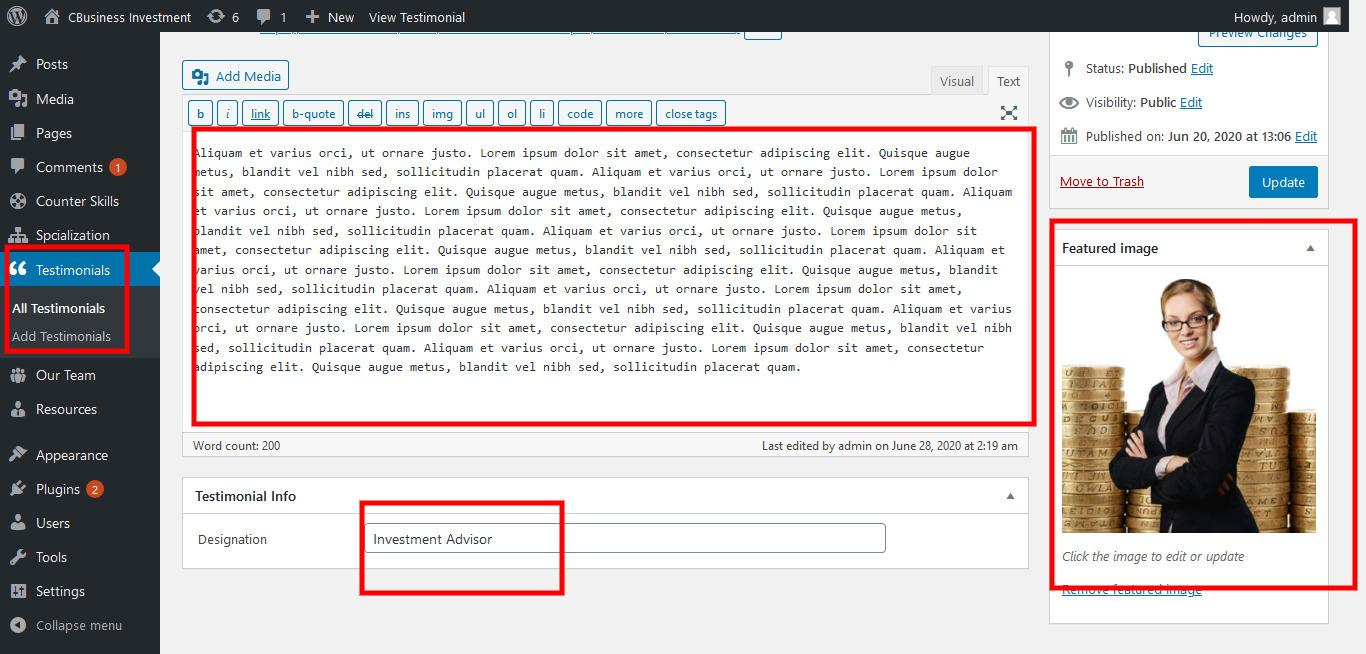
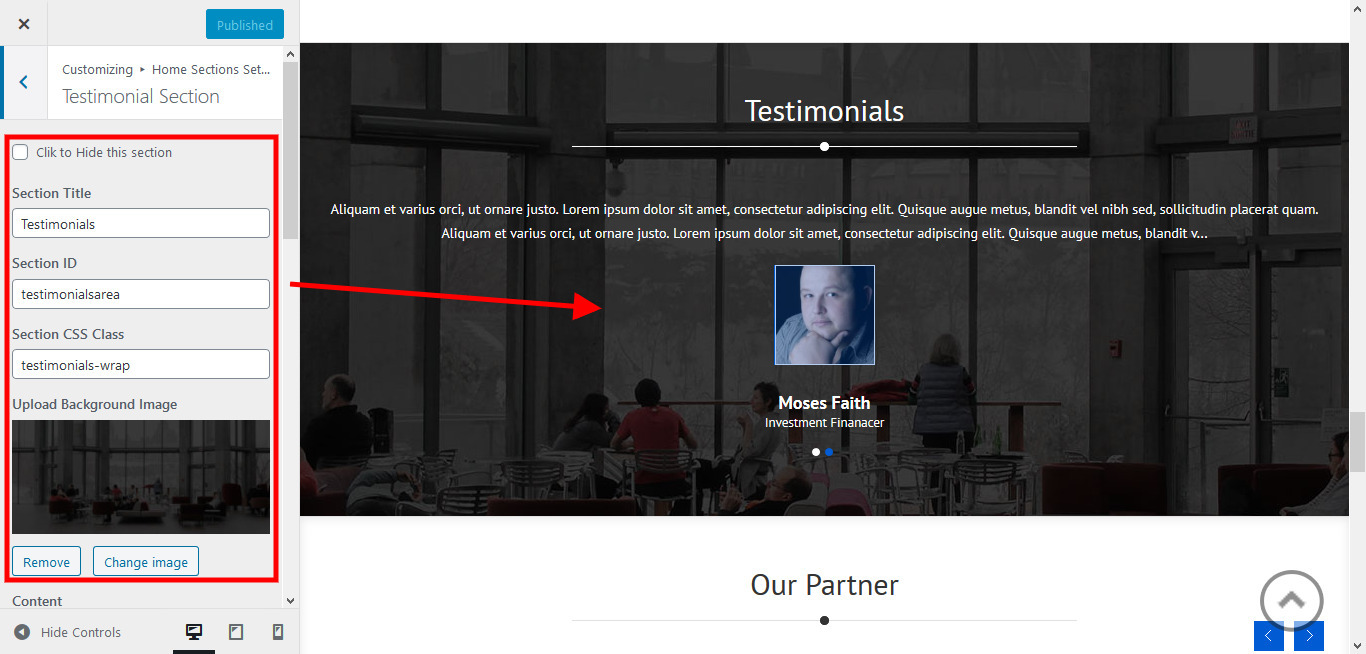
8. Testimonials

This section is used to display client testimonials on your website.
- Create new posts from Testimonials » Add Testimonials
- Add Title, Description, Testimonials Info and set Featured Image
- To manage this section go to Appearance » customize » Home Sections Settings » Testimonial Section
[column_content][underline marginbottom="50"][/column_content][cavetestimonials show="2"]
8. Our Partner

To add partner logo images in this section
- First upload the logo image from the Media Library. Go to Media » Add New
- Copy full path of uploaded image
- Go to Appearance » Customize » Home Sections Settings » Our Clients
- Add image URL in image="" and link in link="" like below
- [client image="http://...." link="#"]
- To manage this section go to Appearance » customize » Home Sections Settings » Partner Section

[client_lists][client image="http://example.com/wp-content/themes/cbusiness-investment-pro/images/client-logo1.jpg" link="#"]
[client image="http://example.com/wp-content/themes/cbusiness-investment-pro/images/client-logo2.jpg" link="#"]
[client image="http://example.com/wp-content/themes/cbusiness-investment-pro/images/client-logo3.jpg" link="#"]
[client image="http://example.com/wp-content/themes/cbusiness-investment-pro/images/client-logo4.jpg" link="#"]
[client image="http://example.com/wp-content/themes/cbusiness-investment-pro/images/client-logo5.jpg" link="#"]
[/client_lists]
8. Membership
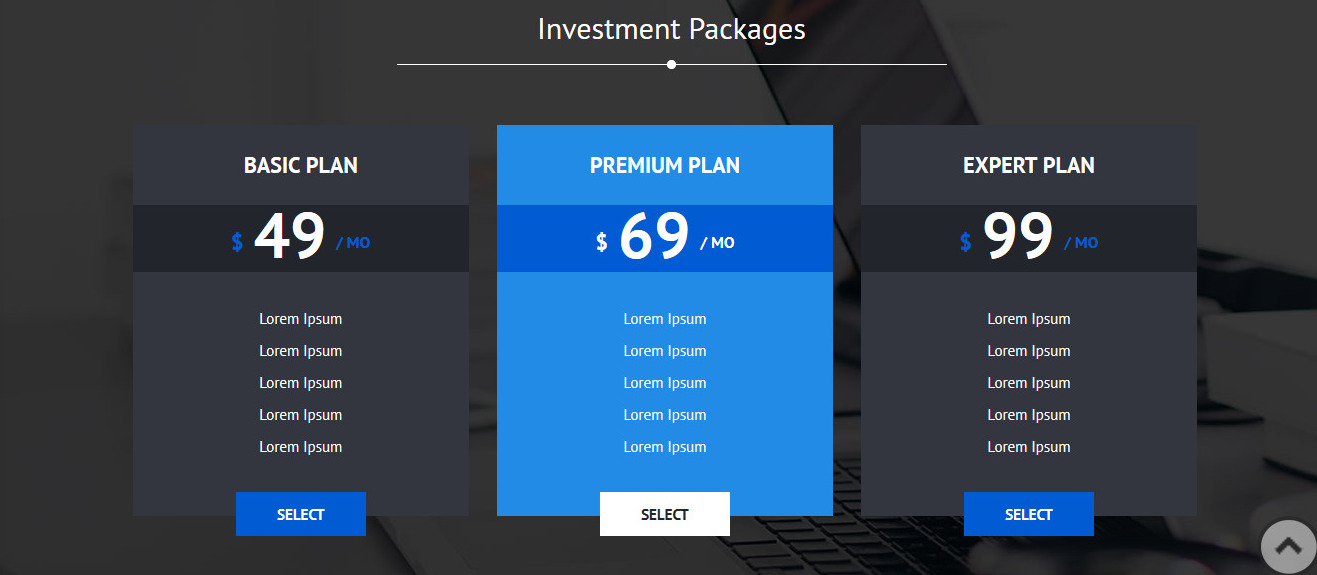
To add partners logo image in this secton
- To manage this section go to Appearance » customize » Home Sections Settings » Plans Section
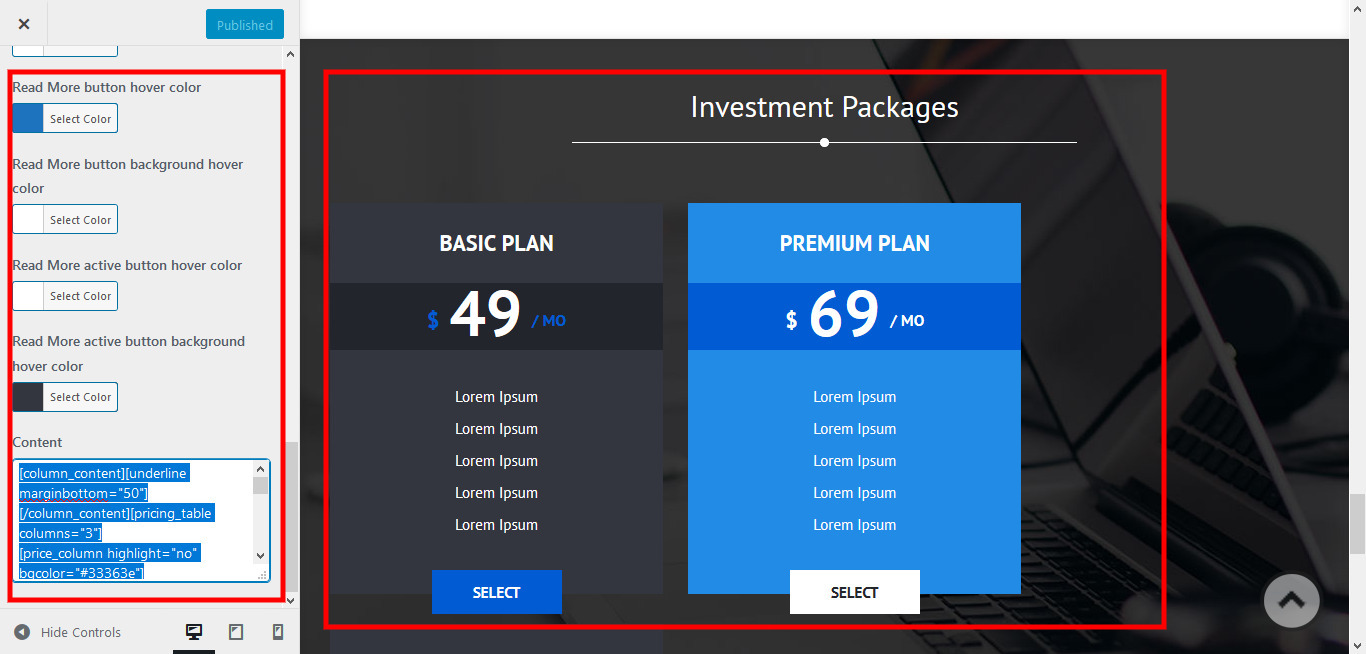
[column_content][underline marginbottom="50"][/column_content][pricing_table columns="3"]
[price_column highlight="no" bgcolor="#33363e"]
[price_header]BASIC PLAN[/price_header]
[package_price bgcolors="#22252b" currancy="$" duration="MO"]49[/package_price]
[price_row]Lorem Ipsum[/price_row]
[price_row]Lorem Ipsum[/price_row]
[price_row]Lorem Ipsum[/price_row]
[price_row]Lorem Ipsum[/price_row]
[price_row]Lorem Ipsum[/price_row]
[price_row] [/price_row]
[price_footer link="#1"]Select[/price_footer]
[/price_column]
[price_column highlight="yes" bgcolor="#228be6"]
[price_header]PREMIUM PLAN[/price_header]
[package_price bgcolors="#015cd3" currancy="$" duration="MO"]69[/package_price]
[price_row]Lorem Ipsum[/price_row]
[price_row]Lorem Ipsum[/price_row]
[price_row]Lorem Ipsum[/price_row]
[price_row]Lorem Ipsum[/price_row]
[price_row]Lorem Ipsum[/price_row]
[price_row] [/price_row]
[price_footer link="#2"]Select[/price_footer]
[/price_column]
[price_column highlight="no" bgcolor="#33363e"]
[price_header]EXPERT PLAN[/price_header]
[package_price bgcolors="#22252b" currancy="$" duration="MO"]99[/package_price]
[price_row]Lorem Ipsum[/price_row]
[price_row]Lorem Ipsum[/price_row]
[price_row]Lorem Ipsum[/price_row]
[price_row]Lorem Ipsum[/price_row]
[price_row]Lorem Ipsum[/price_row]
[price_row] [/price_row]
[price_footer link="#3"]Select[/price_footer]
[/price_column]
[/pricing_table]
7. Footer
The Footer section consists of four main elements:
- Social Icons
- About Company
- Quick Links
- Our Services
- Latest Posts
- Copyright Text
To manage footer Layout go to the Appearance » Customize » Footer Settings » Footer Layout
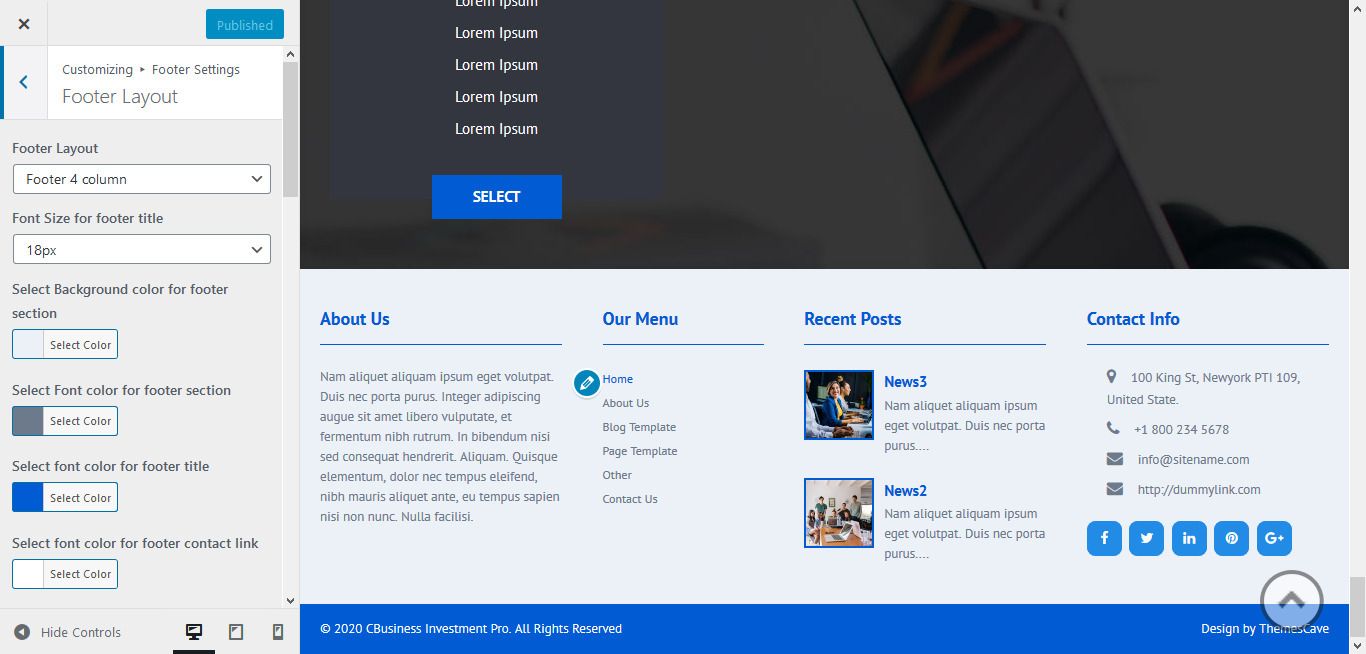
To manage footer section go to the Appearance » Customize » Footer Settings » Footer Column Sections

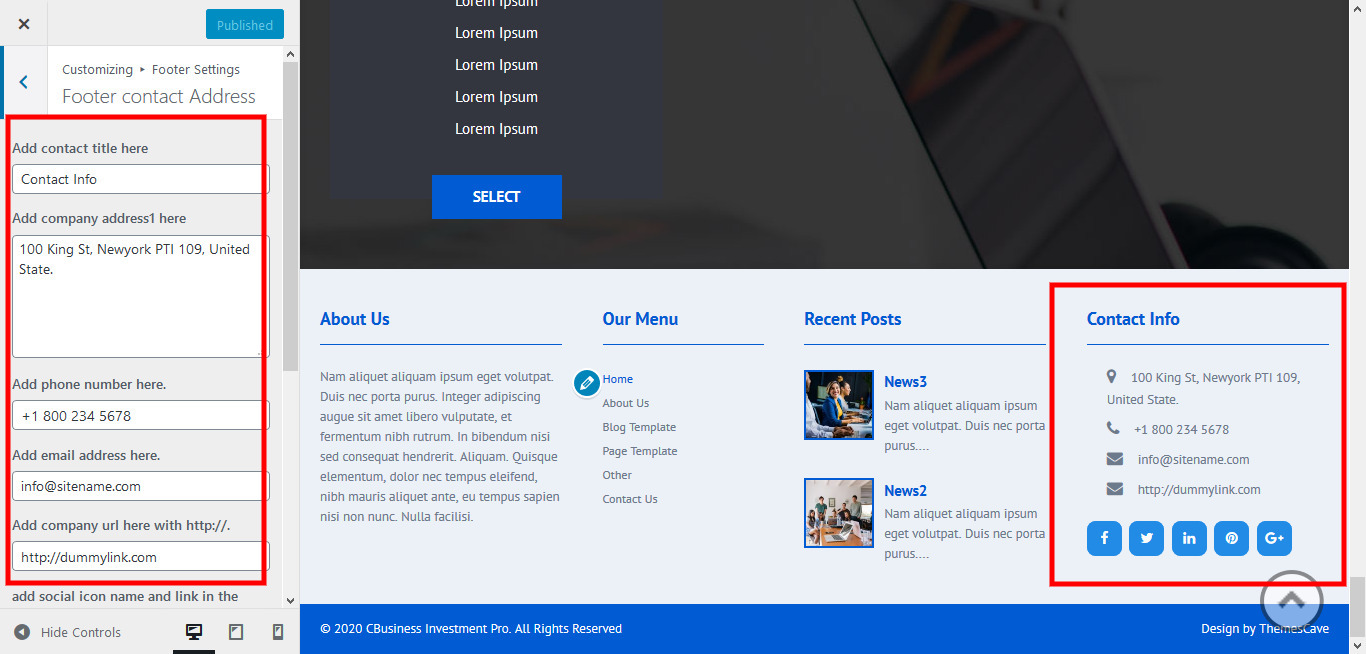
To manage footer contact address section go to the Appearance » Customize » Footer Settings » Footer Contact Address Sections
To manage footer copyright section go to the Appearance » Customize » Footer Settings » Copyright & Design
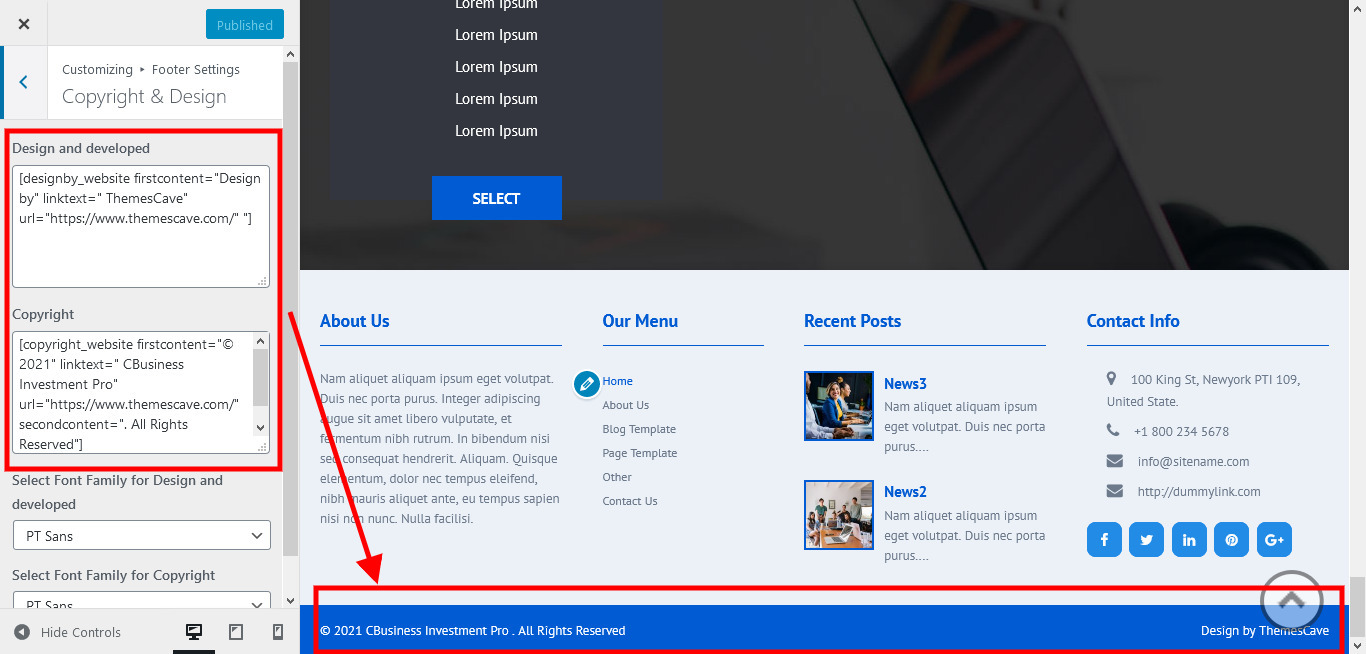
[designby_website firstcontent="Design by" linktext=" ThemesCave" url="https://www.themescave.com/"]
[copyright_website firstcontent="© 2020" linktext=" CBusiness Investment Pro" url="https://www.themescave.com/" secondcontent=". All Rights Reserved"]
8. Setting footer menu
- Go to Appearance >> Menu
- Click on Create a new menu link to create footer menu
- Give a name to your menu (Footer Menu / Support Menu) in Menu name and click save menu button
- Add pages by selecting with checkboxes.
- Select Display location Footer Menu from Menu Settings
- Click Save Menu after adding required pages, categories in the menu

10. Contact Form

To display contact form in your website
- Create contact page from Pages » Add new page
- Select Contact Us Template from Page Attribute section
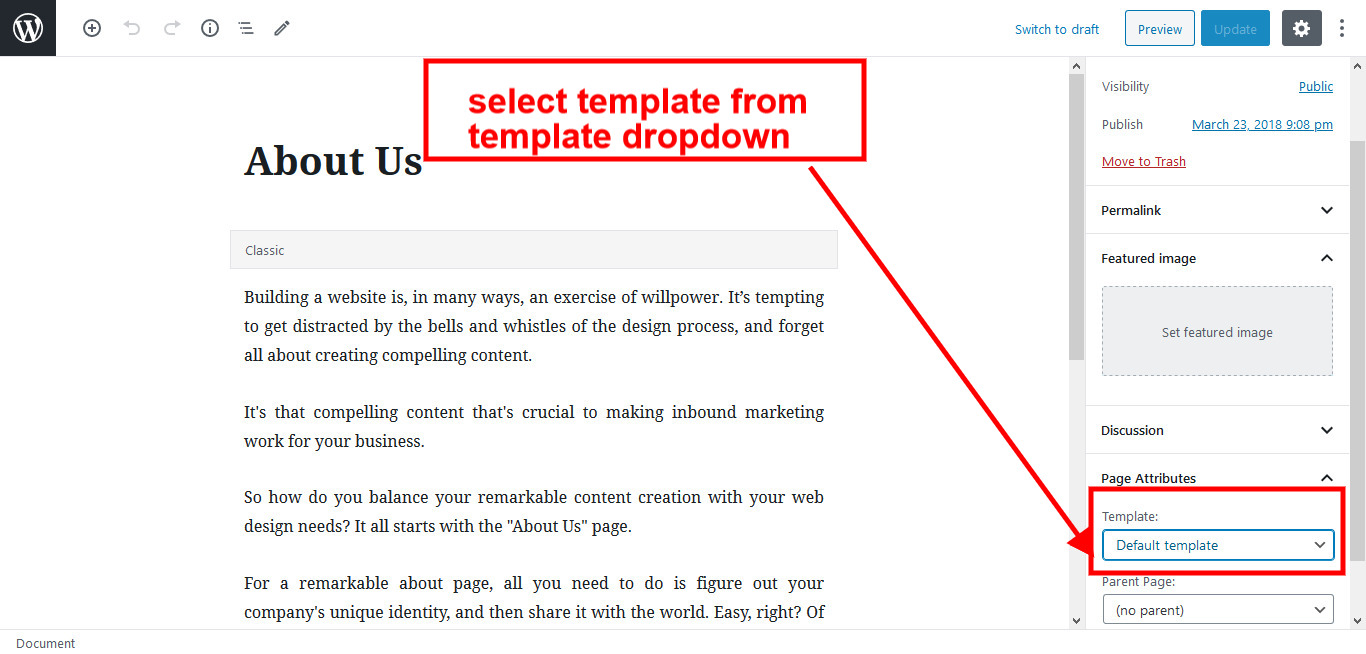
11. Page Templates & Sidebars
you can assign template to pages inplace of default template.
- Default Template
- Used to setting up the content on any page with Right Sidebar
- Left Sidebar
- Used to setting up the content on any page with Left Sidebar
- Full Width
- Used to setting up the content on any page without Sidebar
- No Sidebar
- Used to setting up the content in center on any page without Sidebar
- Contact Us
- Used to setting up the contact page.
12. Widgets
The WordPress widgets are used to manage sidebars:
- Can manage sidebar from widgets (exa. blog sidebar and main sidebar)
- If you want to remove a default widget, go to Appearance » Widgets
- Then you can add any section in that blog and main sidebar, so then default sidebar will get removed
- Footer section can manage from footer widgets 1,2.3,4

13. Shortcodes
- Resource:
[column_content][resources button_text="Read More"][/column_content]
- Welcome:
[column_content][underline marginbottom="50"][/column_content][welcome_website content="Phasellus nec metus scelerisque, Proin id vehicula enim feugiat est quis, vestibulum ante. Proin id vehicula enim Pellentesque habitantPhasellus nec metus scelerisque, Proin id vehicula enim feugiat est quis, vestibulum ante. Proin id vehicula enim Pellentesque habitantPhasellus nec metus scelerisque, Proin id vehicula enim feugiat est quis, vestibulum ante. Proin id vehicula enim Pellentesque habitant" text="Get Started" url="#"]
- Counter :
[counter_skill show="5"]
- Spcialize :
[column_content][underline marginbottom="50"][/column_content][TSpcialization image="https://themescave.com/demo/cbusiness-investment-pro/wp-content/uploads/2020/06/offerthumb.jpg" show="6"]
- Team:
[column_content][underline marginbottom="50"][/column_content][caveteam show="4" teamcontent="Seed quis ultricies sapien, et bibendum ligula. Nam consequat velit orci, posuere volutpat quam viverra sit amet. Phasellus tempor diam non nunc hendrerit lobortis consectetur at dui. Fusce varius velit eu mauris placerat vulputate"]
- Plan Membership:
[column_content][underline marginbottom="50"][/column_content][pricing_table columns="3"]
[price_column highlight="no" bgcolor="#33363e"]
[price_header]BASIC PLAN[/price_header]
[package_price bgcolors="#22252b" currancy="$" duration="MO"]49[/package_price]
[price_row]Lorem Ipsum[/price_row]
[price_row]Lorem Ipsum[/price_row]
[price_row]Lorem Ipsum[/price_row]
[price_row]Lorem Ipsum[/price_row]
[price_row]Lorem Ipsum[/price_row]
[price_row] [/price_row]
[price_footer link="#1"]Select[/price_footer]
[/price_column]
[price_column highlight="yes" bgcolor="#228be6"]
[price_header]PREMIUM PLAN[/price_header]
[package_price bgcolors="#015cd3" currancy="$" duration="MO"]69[/package_price]
[price_row]Lorem Ipsum[/price_row]
[price_row]Lorem Ipsum[/price_row]
[price_row]Lorem Ipsum[/price_row]
[price_row]Lorem Ipsum[/price_row]
[price_row]Lorem Ipsum[/price_row]
[price_row] [/price_row]
[price_footer link="#2"]Select[/price_footer]
[/price_column]
[price_column highlight="no" bgcolor="#33363e"]
[price_header]EXPERT PLAN[/price_header]
[package_price bgcolors="#22252b" currancy="$" duration="MO"]99[/package_price]
[price_row]Lorem Ipsum[/price_row]
[price_row]Lorem Ipsum[/price_row]
[price_row]Lorem Ipsum[/price_row]
[price_row]Lorem Ipsum[/price_row]
[price_row]Lorem Ipsum[/price_row]
[price_row] [/price_row]
[price_footer link="#3"]Select[/price_footer]
[/price_column]
[/pricing_table]
- Partner:
[column_content][underline marginbottom="50"][/column_content][client_lists][client image="https://www.themescave.com/demo/cbusiness-investment-pro/wp-content/themes/cbusiness-investment-pro/images/project1.jpg" link="#"][client image="https://www.themescave.com/demo/cbusiness-investment-pro/wp-content/themes/cbusiness-investment-pro/images/project2.jpg" link="#"][client image="https://www.themescave.com/demo/cbusiness-investment-pro/wp-content/themes/cbusiness-investment-pro/images/project3.jpg" link="#"][client image="https://www.themescave.com/demo/cbusiness-investment-pro/wp-content/themes/cbusiness-investment-pro/images/project4.jpg" link="#"][client image="https://www.themescave.com/demo/cbusiness-investment-pro/wp-content/themes/cbusiness-investment-pro/images/project1.jpg" link="#"][client image="https://www.themescave.com/demo/cbusiness-investment-pro/wp-content/themes/cbusiness-investment-pro/images/project2.jpg" link="#"][client image="https://www.themescave.com/demo/cbusiness-investment-pro/wp-content/themes/cbusiness-investment-pro/images/project3.jpg" link="#"][client image="https://www.themescave.com/demo/cbusiness-investment-pro/wp-content/themes/cbusiness-investment-pro/images/project4.jpg" link="#"][/client_lists]
- News:
[column_content][underline marginbottom="50"][/column_content][fthernews show="3"]
- Testimonials:
[column_content][underline marginbottom="50"][/column_content][cavetestimonials show="2"]
- Contact Form:
[contactform to_email="test@example.com" title="Contact Form"]
- Skill :
[skill title="Heart Recover" percent="95" bgcolor="#65676a"][skill title="Cancer Recover" percent="85" bgcolor="#65676a"][skill title="Covid-19 Recover" percent="90" bgcolor="#65676a"][skill title="Heart Transplant Success" percent="80" bgcolor="#65676a"]